
Two videos back I did a bunch of tests on whether resin or filament prints were stronger. Basically, the resins we use, at least that’s the common impression, they are much more brittle than the plastics we use as filaments, but on the other hand, resin prints have no layers adhesion issues, so I wanted to find out if that would actually make resin prints weaker or stronger in the end.
Turns out that “it depends” really is the only answer here, and we saw the prints from Elegoo ABS-like resin slightly beat out PETG in almost every discipline, while the Prusa resin was considerable weaker in many use cases. But I hadn’t tested whether the direction my samples were printed had actually mattered, so I started working on testing that as a follow-up, but that only created more questions than it answered. So let’s dig through those today and see where that rabbit hole takes us.
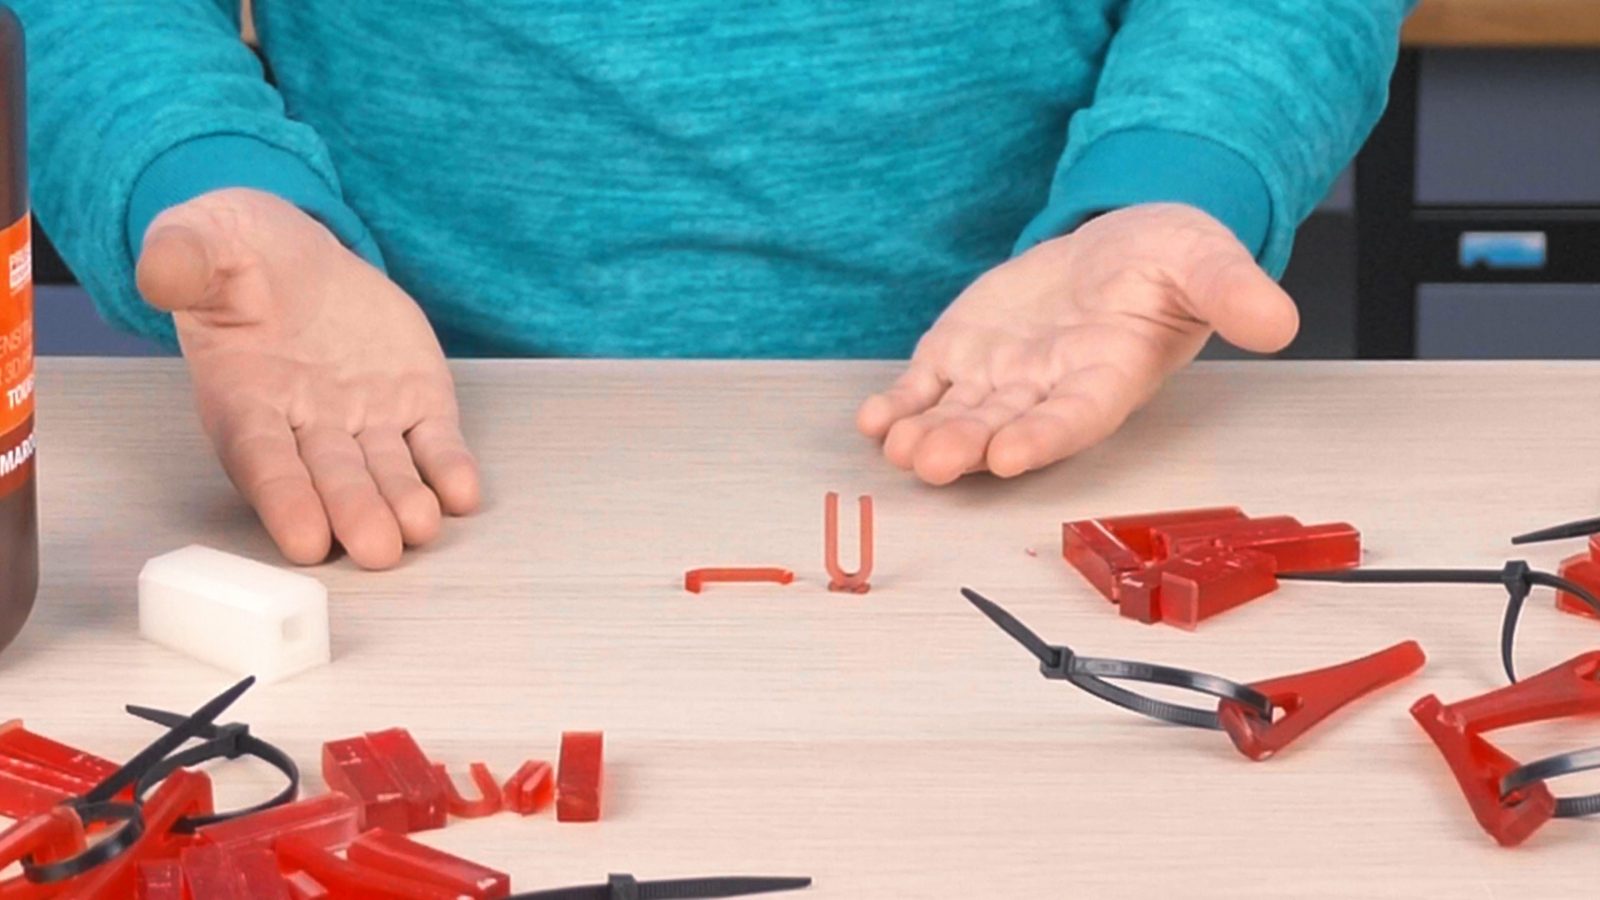
Okay, let’s cut right to the chase. Originally, I had only printed the impact and bend tests for the resin prints in only one orientation to speed up printing and to save a bit of resin. Remember, unlike the filament tests, these samples are 100% infill, so they do use up quite a bit of material. What isn’t a 100%, though, is the percentage of you who are watching, but aren’t subscribed, so just click that button. Thanks!
To test whether orientation mattered, I reprinted all the parts for the bend test and the impact test in all orientations – twice.
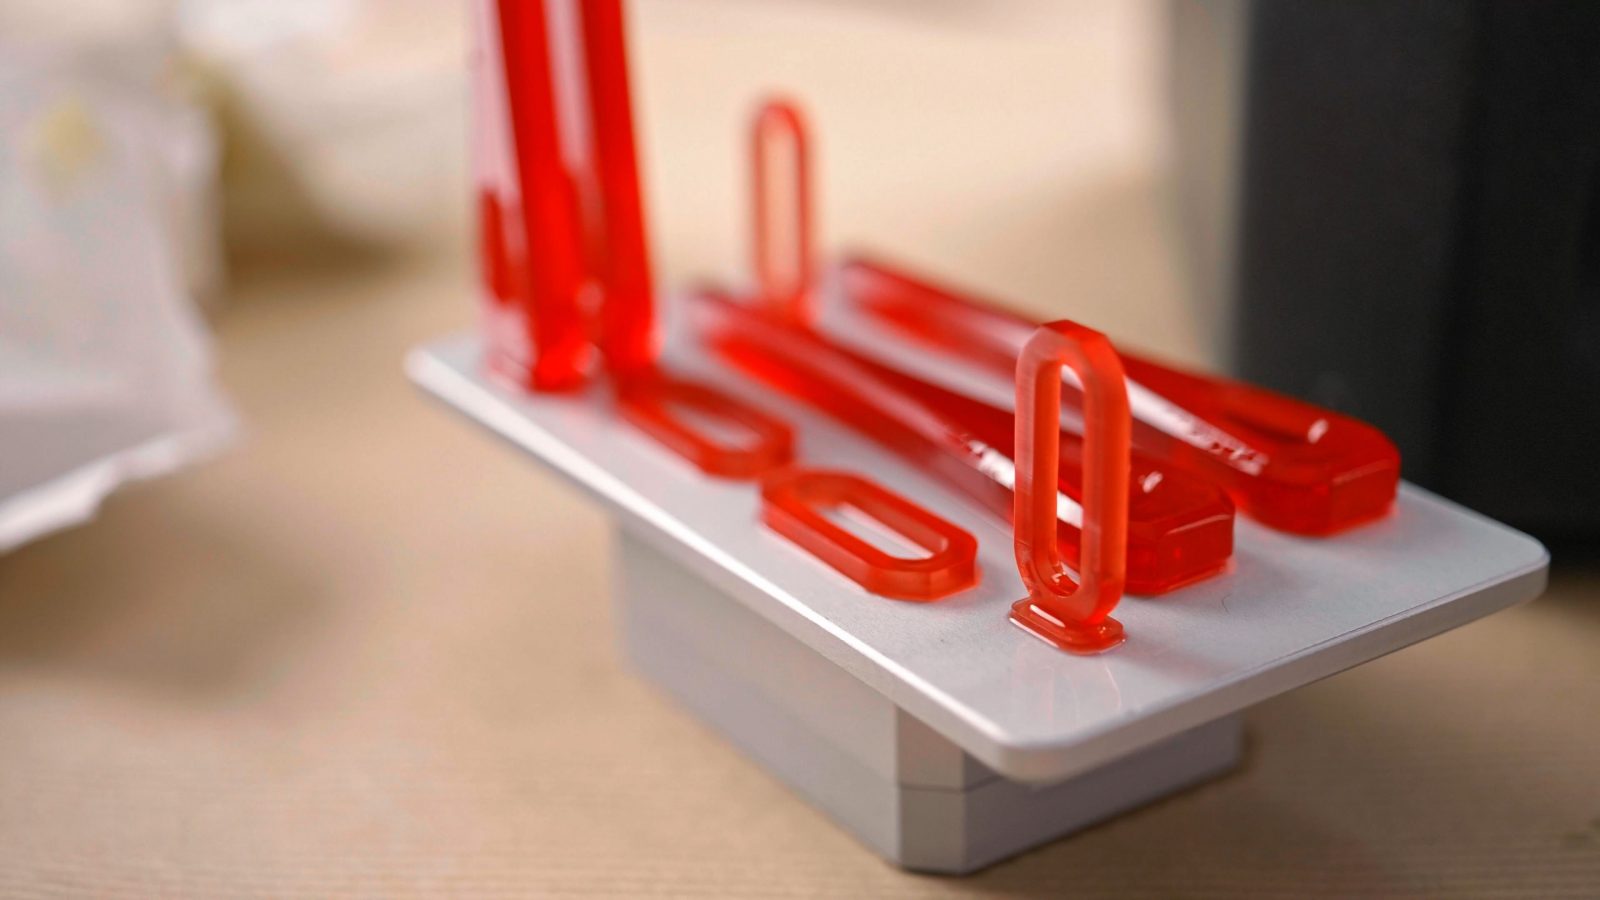
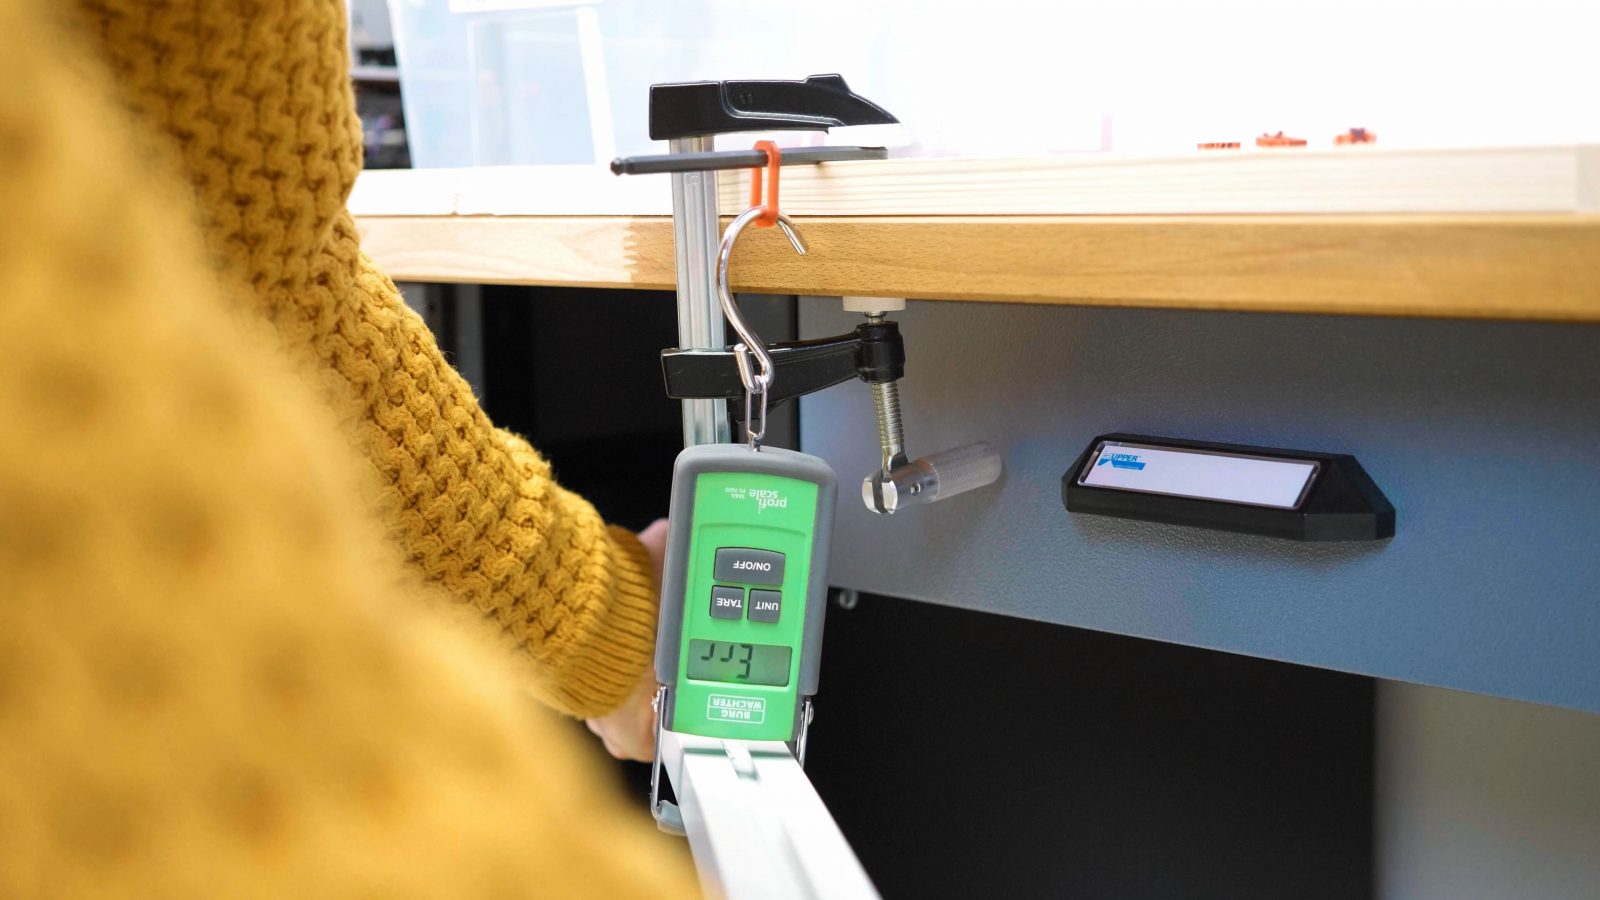
I wanted to make sure these parts would be consistent and not dependent on where exactly they were sitting in the CW1 for curing where they would maybe get a slightly different dose of UV light, because I had already suspected that curing actually had some sort of an impact on my results in the last round. But in this round, it didn’t get better. In fact, the results were massively all over the place. So first off I was reprinting the bend tests at 75% scale – again, saving some material – but I got totally different results compared to the last time I printed them even though I was using the exact same print settings, same material, in this case, the Elegoo ABS-like, and the same curing cycle, which is even temperature-controlled. The first time I tested this part in resin, I was able to load it with 8.1kg before it failed, but on this new second run, I got 2.5 and 4.3kg for the part printed flat and 5 and 6.3kg for the ones printed upright.
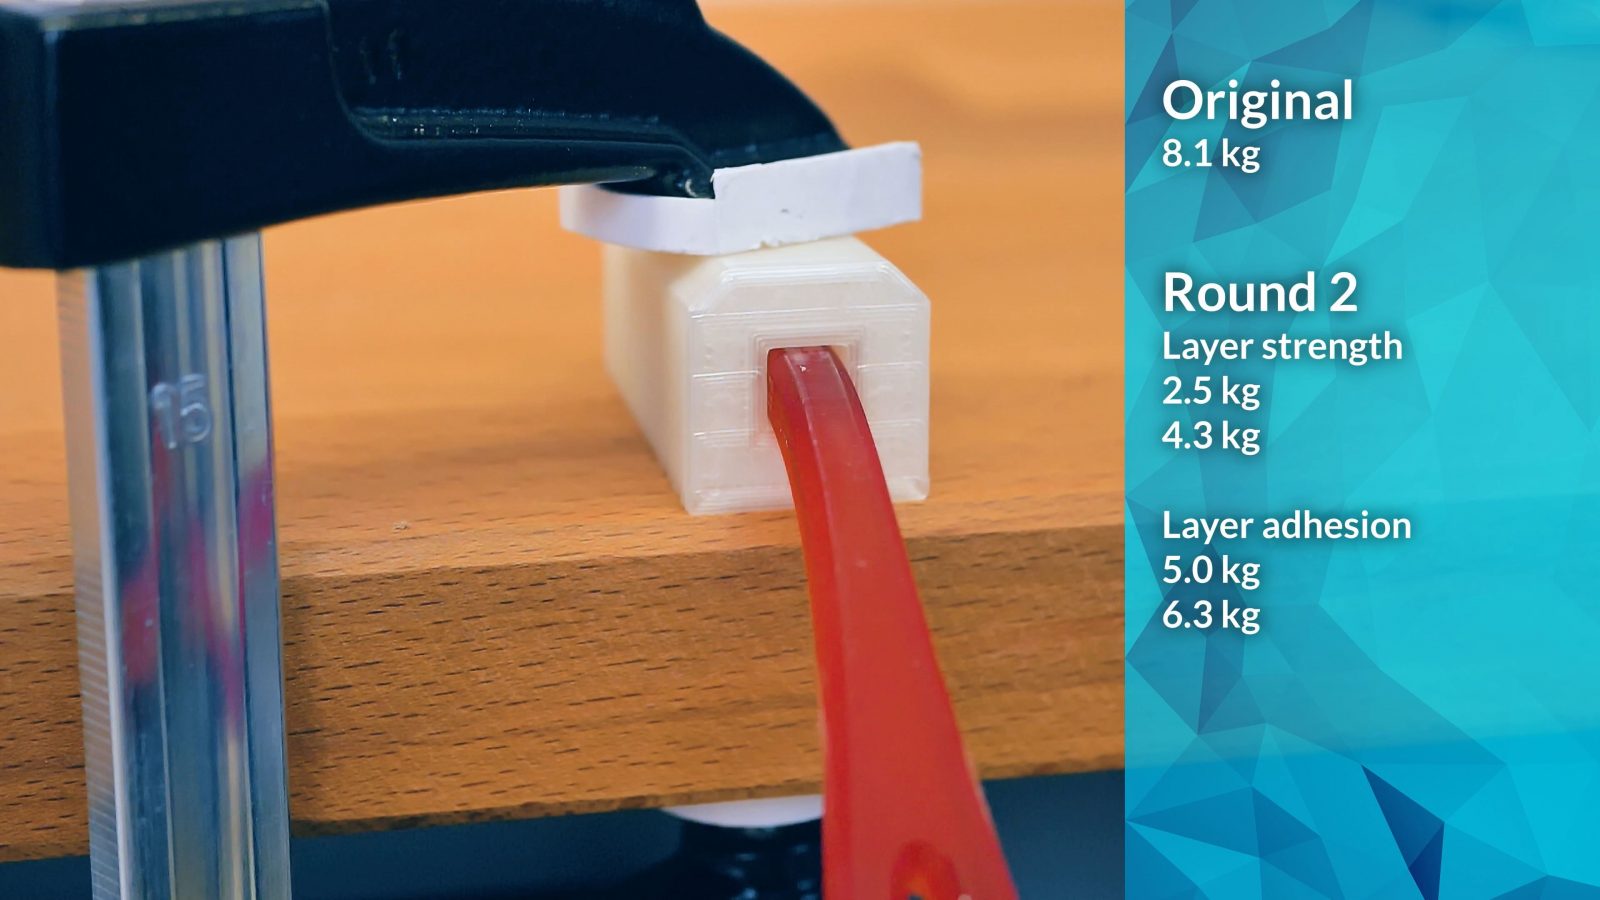
So, ok, first off, every single one of these prints was way weaker than the one I printed the first time around. But also, if you look at the numbers again, not only were they scattered all over the place, but also, the parts printed flat ended up significantly weaker than the ones standing up, so the ones that were printed in a way that would peel the layers apart in the test were actually stronger than the ones printed flat.
For reference, with filament prints there’s usually a 4x difference that the ones printed flat were stronger, not weaker.
Now I realize my test setup isn’t perfect by any means. After all for most of these tests, it’s me, a human, putting my body weight onto a bar that pulls down on a scale, there are a lot of factors that could deviate here, but I’ve done a few tests with filament on how repeatable my results are, and I get within 5-10% percent or so for each individual discipline, and of course that also includes deviations in the filament or the print itself, and even though I rarely did multiple samples for a single material, the overall scores are always an average of multiple separate tests, so it does average out and give an overall good look at what a material will do. If two materials are within 5 or 10% in the final score, I doubt many people will notice a difference in real use anyway. But this was different. Not only are we seeing deviations by a factor of almost 4, we’re also seeing differences in exactly the opposite direction we would expect. And I checked, I didn’t mix up my results.
Instead, what I think was happening here, is that the two parts were cured differently. You see, the one printed standing up had that brim on the bottom that also allowed it to be cured standing up in the CW1, while the other ones had to lay down flat on the rotating platform, which is perforated in a large area, but the exposure to the UV light is probably still different enough to cause a significant difference in how cured the parts actually end up.
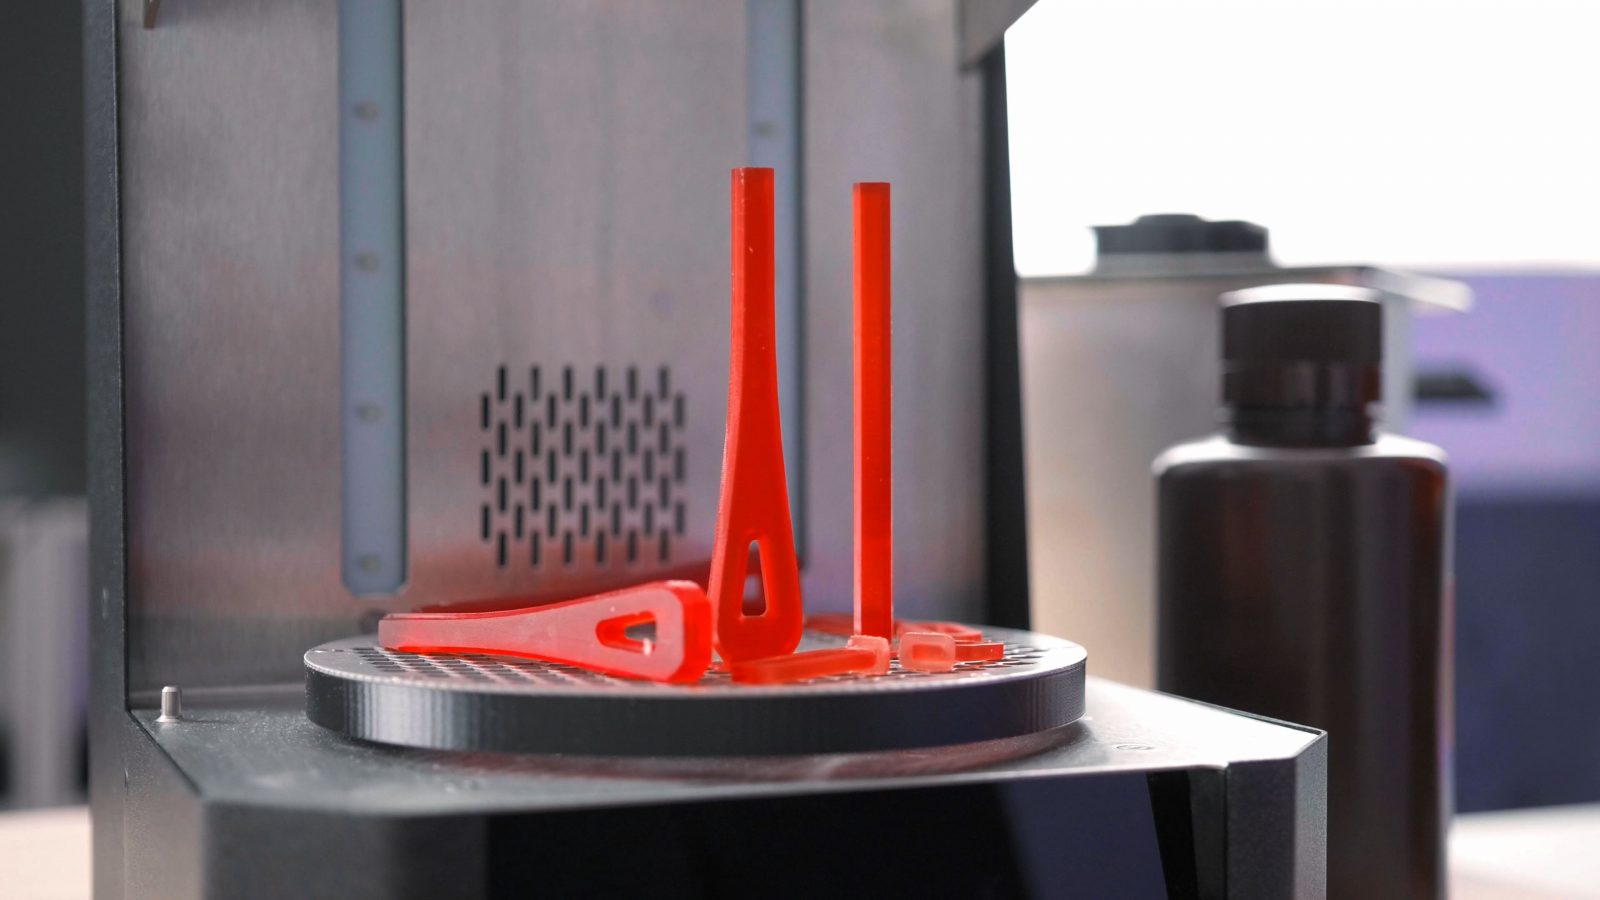
Interestingly, though, I didn’t see that same difference in how the other tests performed, those were printed at the same time and maybe just cured with less deviation – I don’t know, I could start interpreting the results, but I’m just not comfortable doing that before I’ve got a bit more data… data. So the only logical thing to do was to print everything again and then do curing a bit differently. And that’s what I did! Same resin, same print files, but this time I cured each set of parts four separate times and I shuffled them around on the rotating platter before I started each cure cycle.

The CW1’s default is set to 3 minutes drying and heating and then another 3 minutes of UV exposure, I had already cranked that up to 5 minutes drying, 5 minutes curing, so overall, this second set has a total of 20 minutes of UV exposure for each part. I don’t believe you can overcure these, but yeah, just let me know in the comments if that’s something you’d be interested in and I can maybe look into that in the future.
So did that improve things? I guess, yeah? There was still a more variation in these results than what I’m used to and what I’m comfortable with, but at least we can look at what trends we’re seeing, because those are undeniably there. So the bend tests that were pretty horrible before are now back at a comparable level of what I saw in the first round of tests.
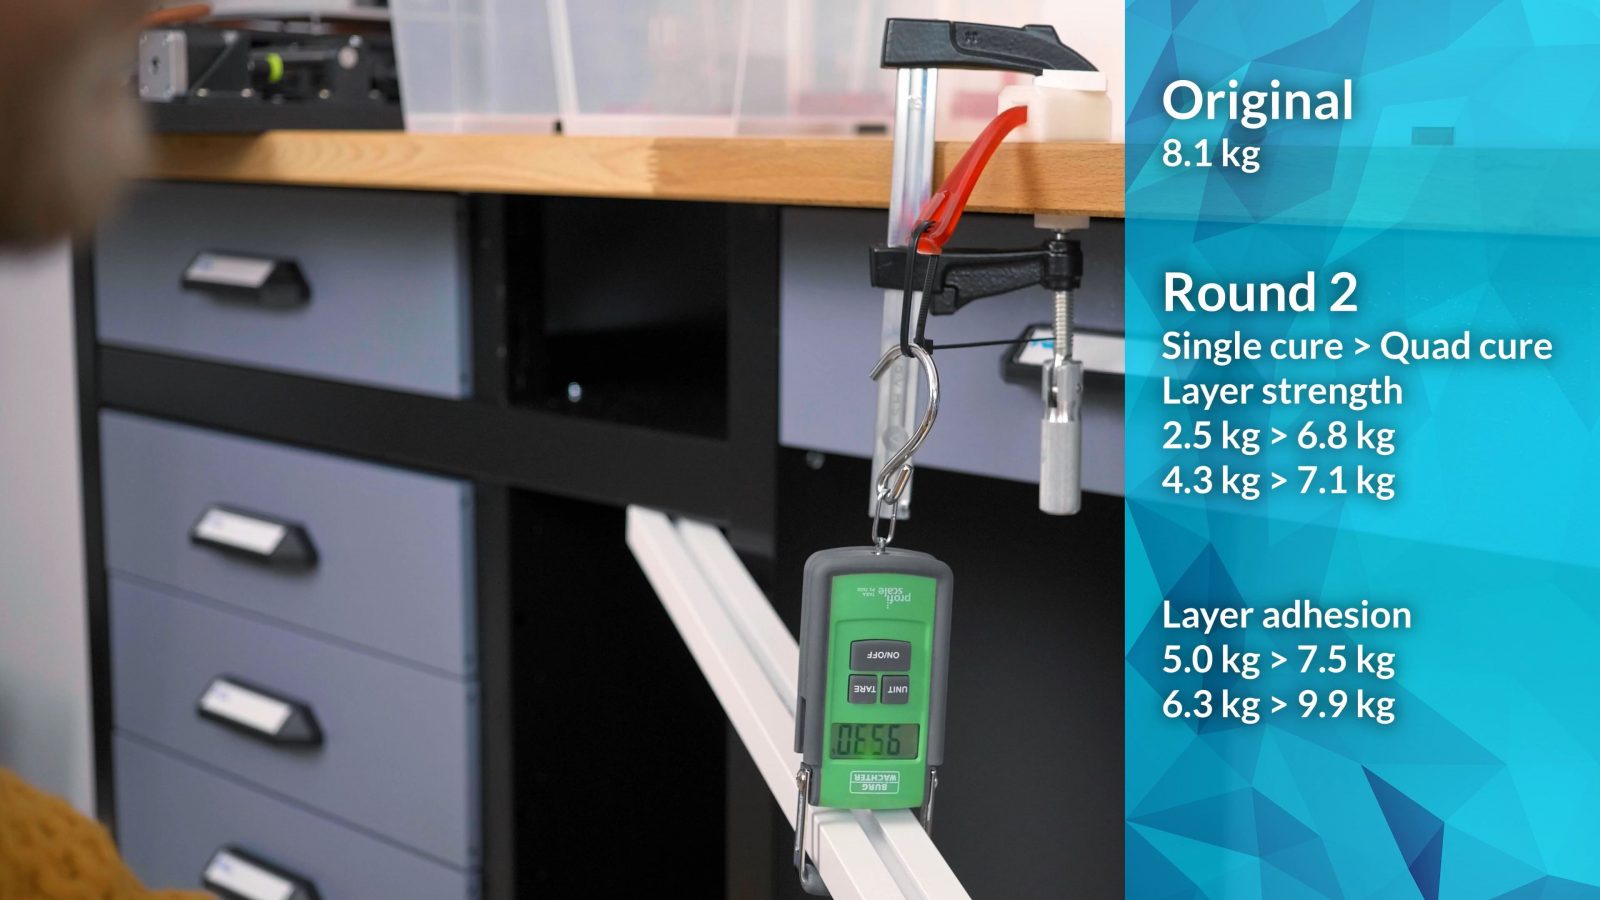
I got 7.1 and 6.8kg for layer strength, and 7.5 and 9.9 kg for layer adhesion, which is in line with the first round of prints I tested. But it’s still striking that the layer adhesion parts were stronger in this case than the layer strength ones, not by much, but again, the opposite of what I’d expect. The impact tests stayed roughly the same, the numbers say the parts that were cured four times are in total about 10% more impact resistant, but there was still a lot of variation, for example the specimen with the notch printed on the side went from 750 and 850 mJ to 700 and 1130-ish mJ, which on average is higher, but then one is lower, the other is higher, so yeah…
What we can definitely see, though, is that there seems to be the same dependency on part orientation for the impact test that we’re used to seeing on filament prints.
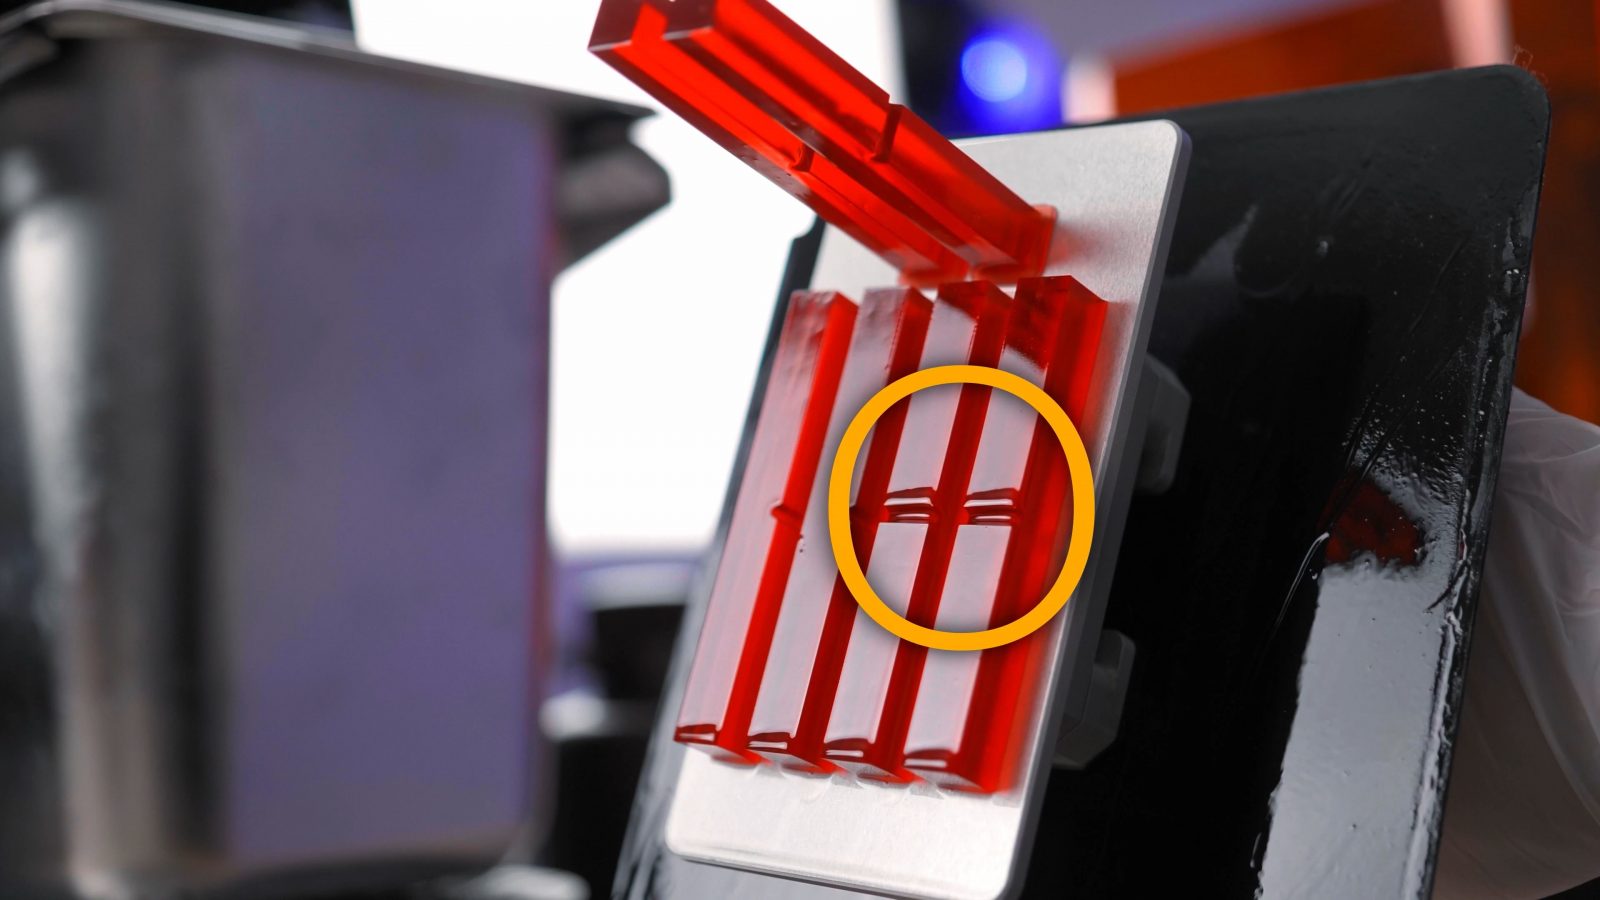
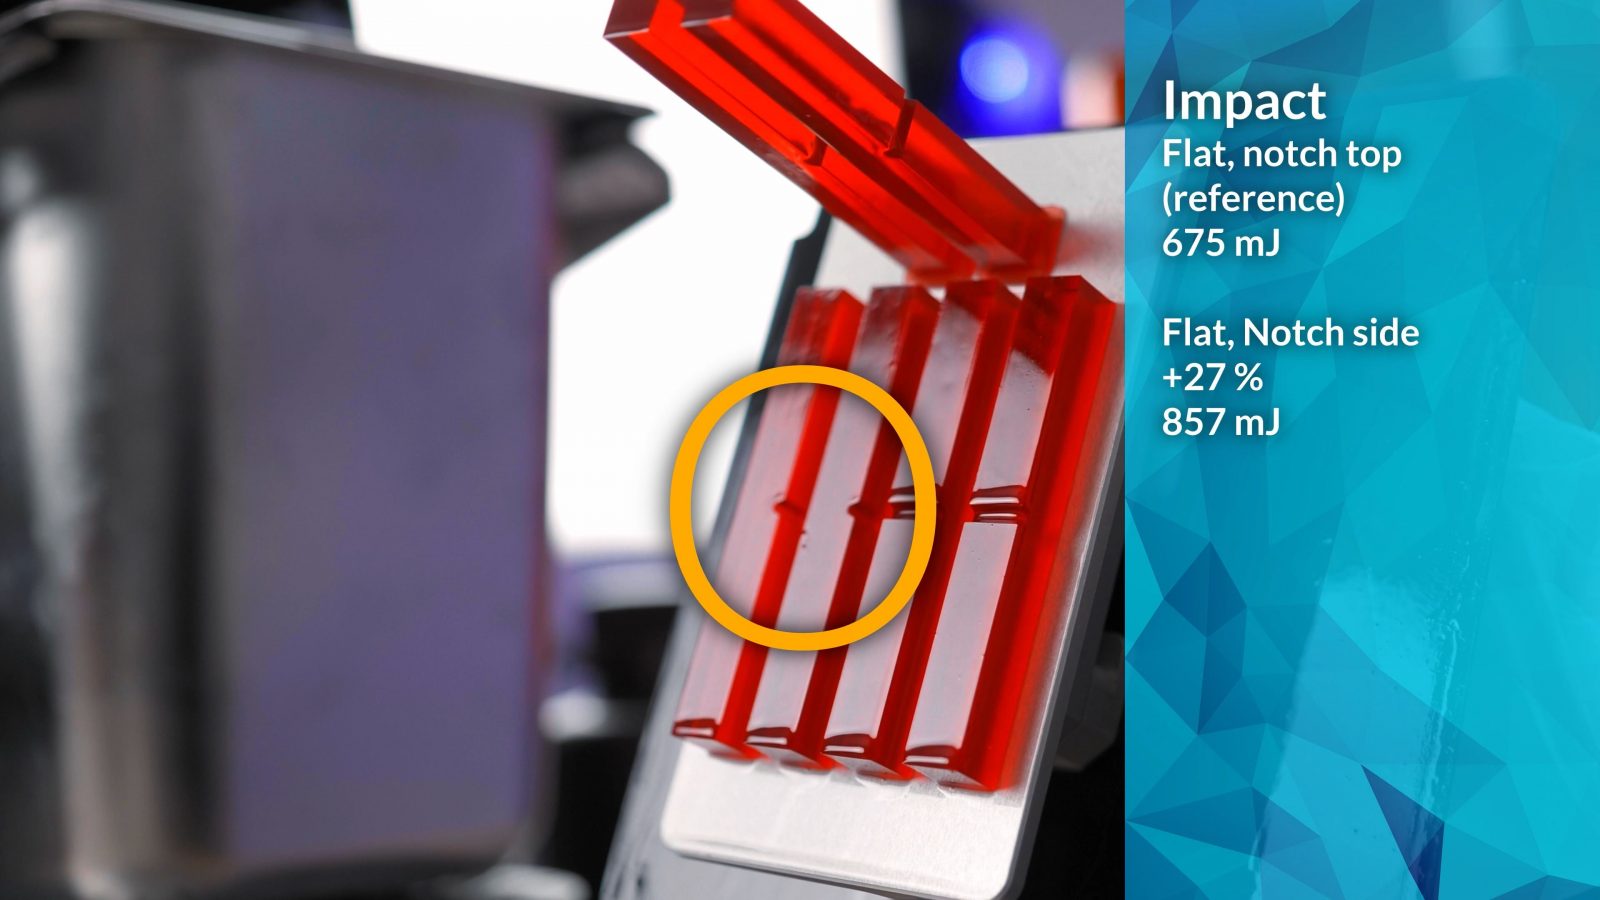
Let’s take the part that’s been printed flat with the notch up, so that we get those interrupted layers on either sides of the notch, let’s take that as reference, that was 675mJ absorbed on average, the parts printed flat with the notch on the side were 27% stronger on average, my thinking is that’s because the layers are uninterrupted in that orientation.
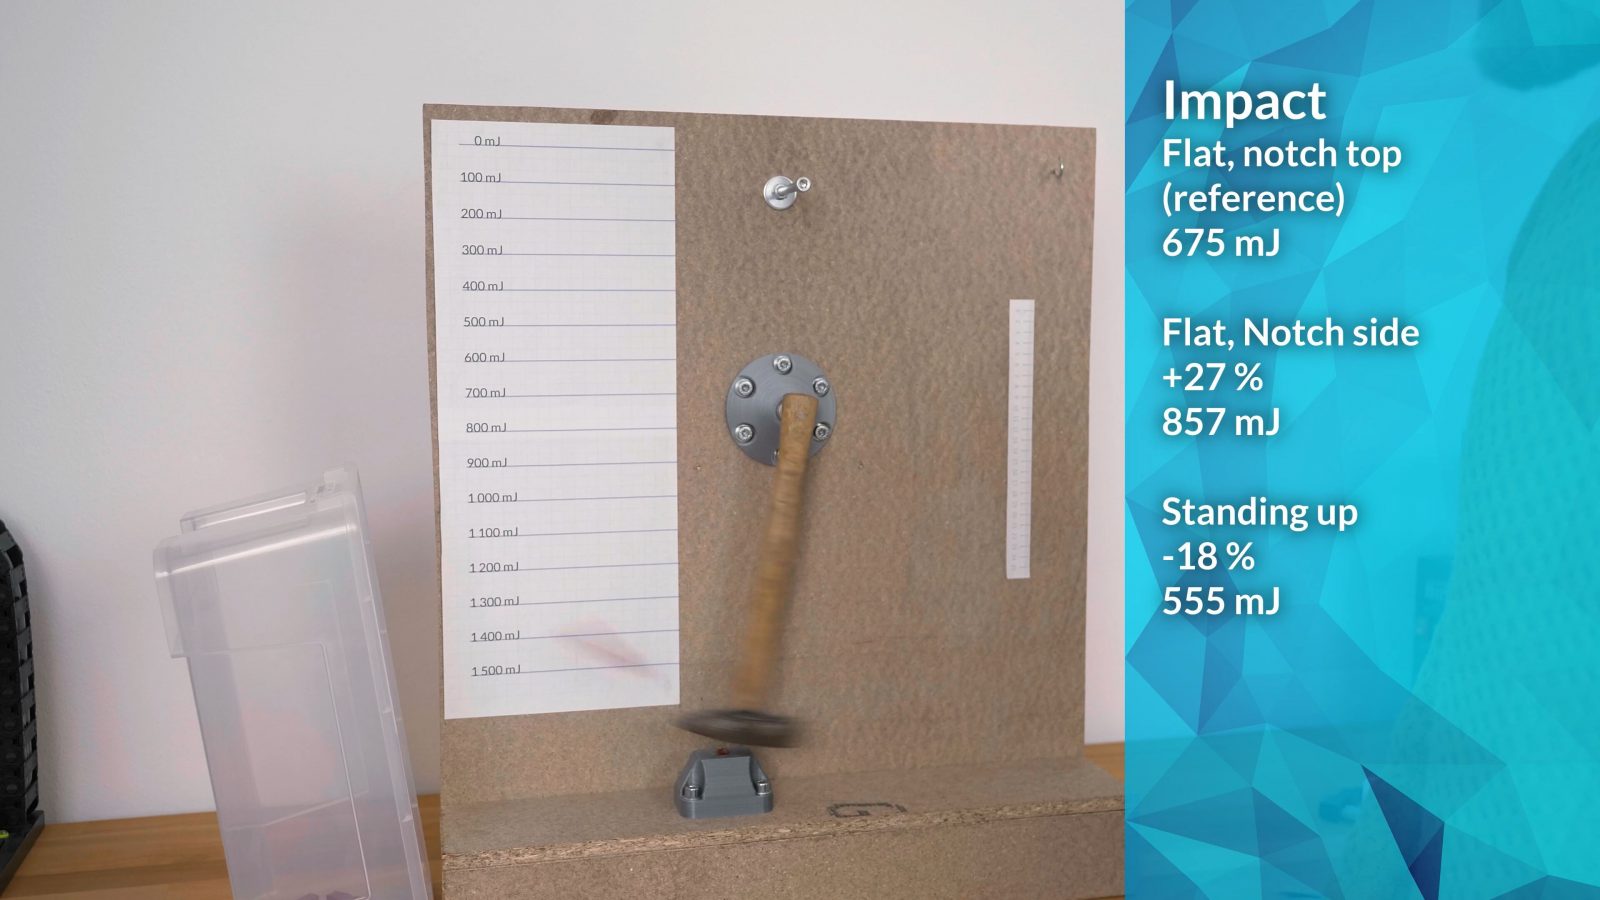
And looking at the parts printed standing up, those were about 18% weaker than our reference. Now, granted, that is much less of a difference than with filament prints, which, in the impact tests, usually turn out 3 to 5 times as strong printed flat vs printed standing up, but the most impact resistant resin orientation is still about 50% better than the worst one. So yes, in this case, we do see a very noticeable difference that would suggest that resin does care about orientation.
But as we jump into the last test I did, the pull test with these rings, I don’t think the results here are usable at all, since, first of all, just like in the bend test, I saw one part that was printed to test layer adhesion outperform another that was printed flat, and then when I quad-cured the second set of part, I completely ran out of capacity on my luggage scale; I did get the parts to break, but I don’t have a reading to tell me how far past 40 kg they made it.
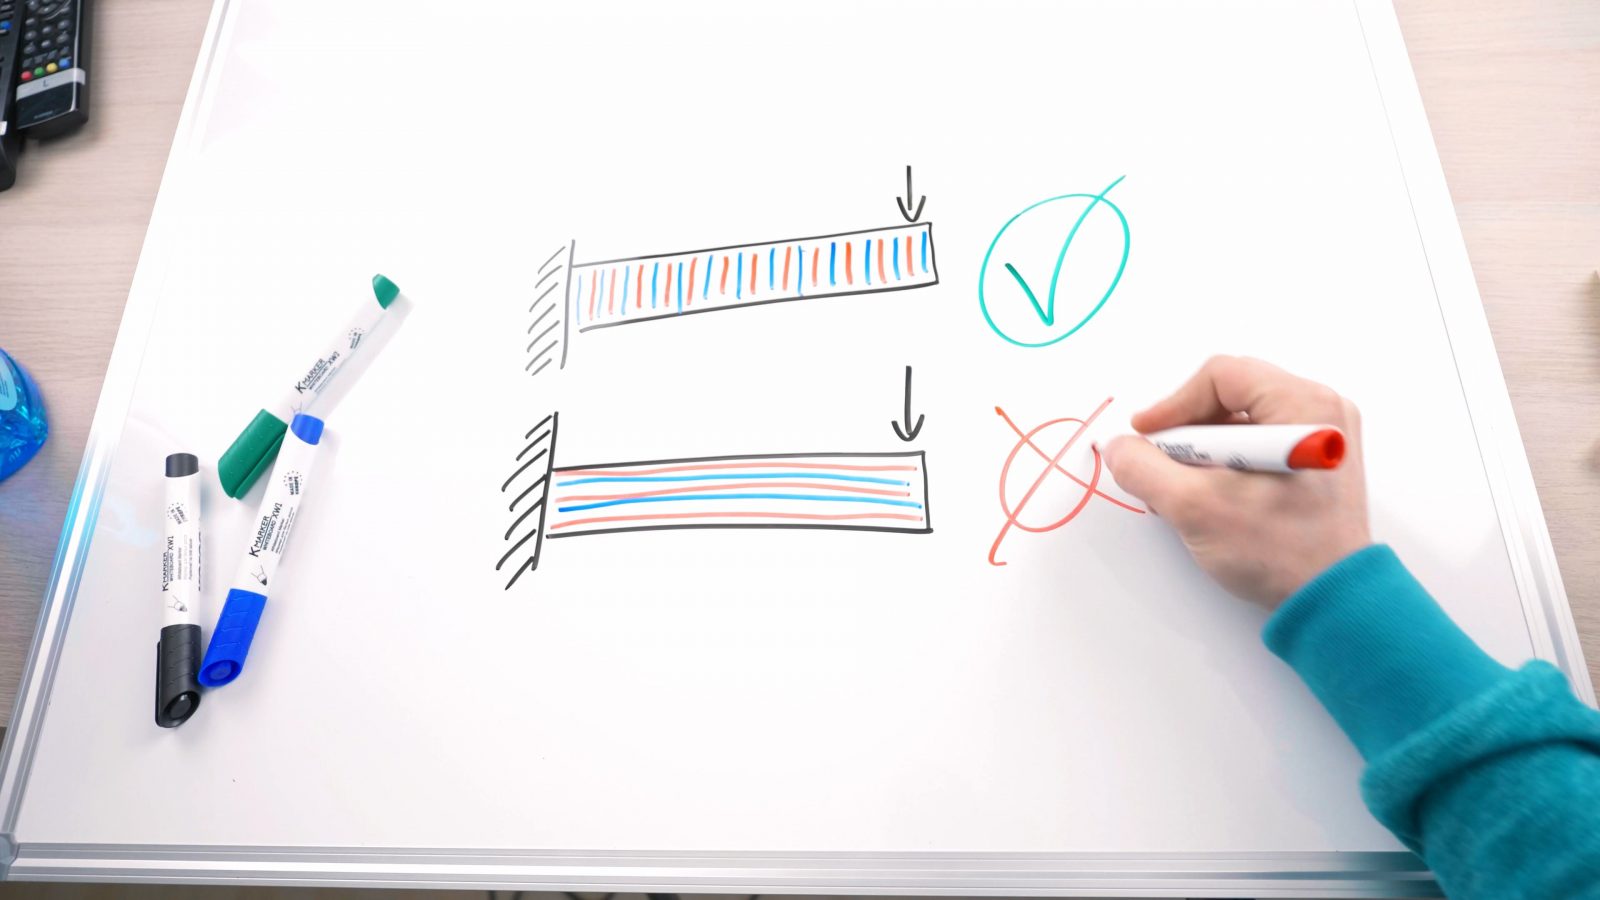
So are resin prints actually isotropic parts, meaning they have the same mechanical properties in all orientations? Definitely no. Of course, this can depend on print settings, resins etc, but from what I’ve seen, on the Prusa SL1 using the Elegoo ABS-like resin, there definitely are differences. But while the impact tests have very similar trends to how filament prints behave, the bend and pull tests seem to be slightly contradicting that by performing better on average when printed in a way that would separate the layers.
Now, I do script most of my videos, this one included, so I’ve had some time to think about why this might be happening and the only good explanation, or speculation that I can come up with is that resin prints end up with, I don’t want to say layers, but plies, or a gradient within one layer, with varying hardness, maybe like how a spine has rigid vertebrae and elastic discs between them.
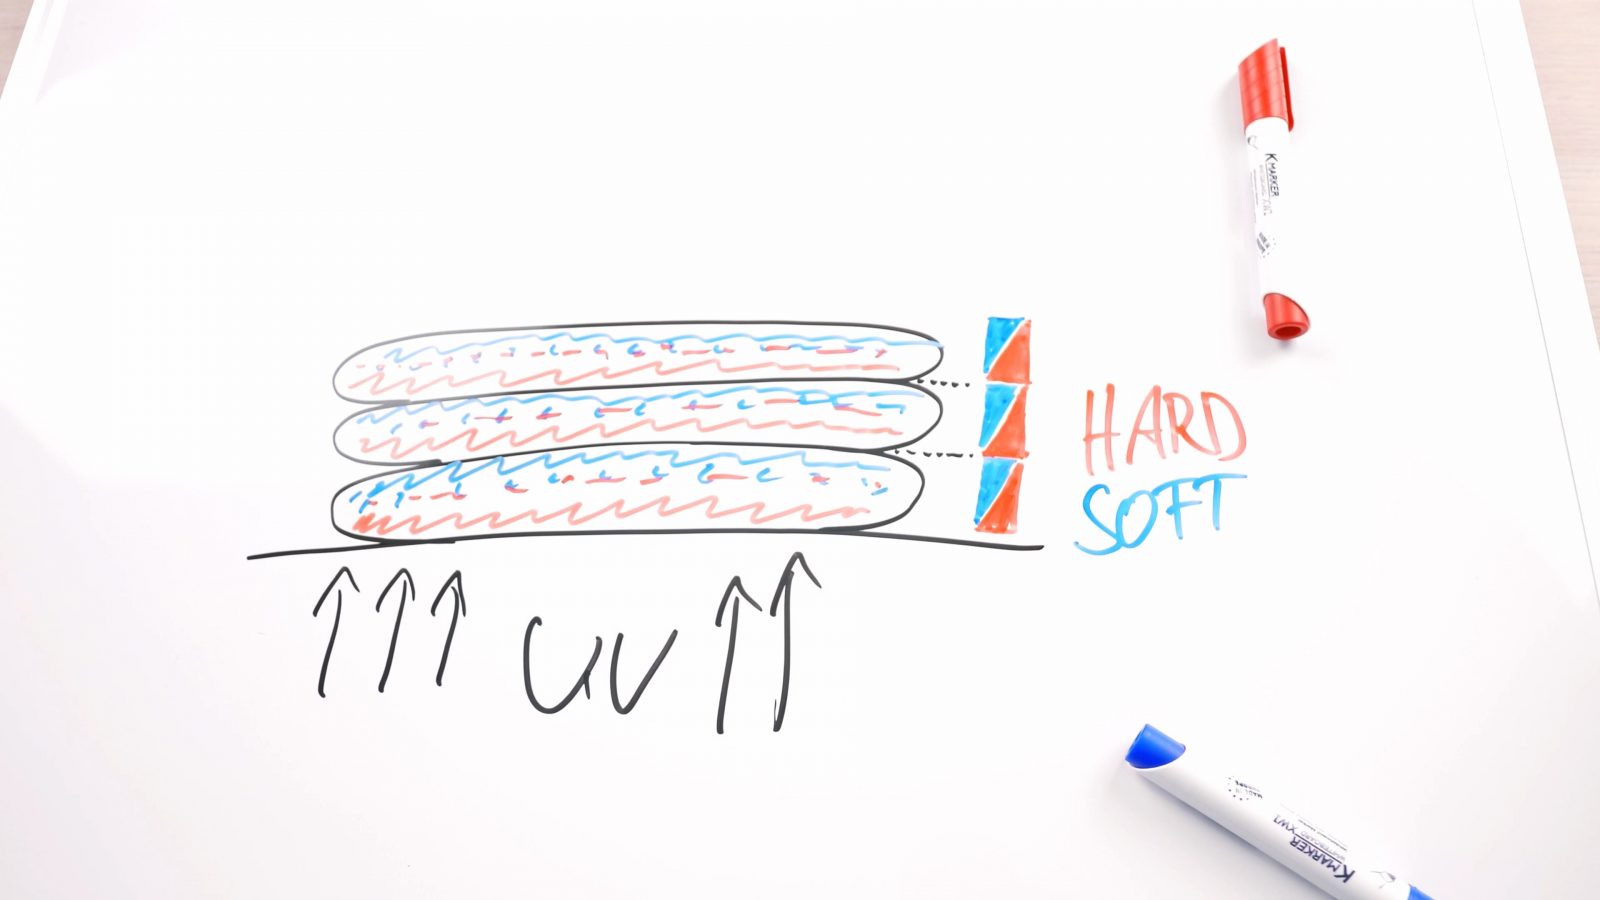
In the load case that we pull on the entire thing, the softer plies stretch and conform, and just like in for example PETG, help distribute the load across the entire cross-section that the part has, but in bending or sideways load, the entire stress is taken up by just the plies that are harder, while the softer ones just flex away and conform without actually helping support the load.
In my mind, that makes a lot of sense right now, and I think is even consistent with what the bend test was doing, but I could be completely wrong. If you have a different explanation for what I’ve seen or have made entirely different observations, please do let me know in the comments below, I’m finding these details quite fascinating, but I also wouldn’t have expected that the resin prints would end up performing so inconsistently. Even in the impact tests, which remove me as the human element for the performing the tests, there still seems to be enough leeway in the entire resin printing process to create some quite unpredictable results.
In either case, I hope you found this just as interesting as I did, but I think I’ll take it easy on resin printing tests for a bit, especially since I’m already feeling my nose and throat getting reactions to that resin smell again when I walk into a room that just has a resin machine in it. But yeah, make sure you’re subscribed and if you don’t want to miss new videos, get that bell on. I hope you noticed, but I’m trying to get on a weekly upload schedule, every Friday afternoon, there’s more to come, hope you enjoyed, keep on making, and I’ll see you in the next one.
💙 Enjoying the videos? Support my work on Patreon!
Product links are affiliate links – I may earn a commission on qualifying purchases (at no extra cost to you)

Check out my second channel “More Layers” on YouTube for livestreams